| Note: From October 1st, 2025, we introduced new plans that better reflect how our customers use Deputy: Lite, Core, and Pro. If you're an existing customer, look out for an email with all the details you’ll need. Learn more about the new plans and what this change means for you. |
|
Important Notice: Information provided by Deputy is intended for general guidance purposes only and is not a substitute for professional legal or financial advice. Deputy does not accept liability for actions taken based on this information. Employers are responsible for ensuring their employees are paid correctly in line with the applicable award/s, industrial instrument/s and relevant employment agreements. For specific issues or if you are unsure about your employee/s’ entitlements, please consult a legal, financial or employment relations specialist. Deputy does not offer advice on employment law or taxation matters, including payroll specifics. |
This article is for managers with an access level of Supervisor or higher who may need to enter leave for their employees.
For more information on setting up Leave in Deputy please read Leave Management.
This article will cover:
Adding leave for others
There are various reasons why a manager might need to enter leave on behalf of employees:
- The leave entitlement has been set as not visible to employees for organizational reasons
- The employee is unable to as they are sick, for example.
Note: These actions can only be performed via the web browser and not from within the deputy app.
Permissions:
System Administrators and Location Managers will see and can select any leave type set up in the organization when adding leave for others, even if that particular employee has not been assigned that leave type in their profile. However, the list will be divided into two groups: 'Entitled' and 'Not entitled'.
Supervisors can only enter the times and days that the team member is on leave, and then the leave request must be approved by a System Administrator or Location Manager who will assign the leave type and approve the leave.
Adding leave via employee profile
Go to the People page and click on the employee name you would like to add leave to.
In the Leave section on the left-hand menu, click on Add leave request.
Select the date for the leave to apply (all day or part of the day), select a leave type, add a comment and click on Request & Approve to add and approve the leave in one step.
Adding Leave via Timesheets
It is also possible to add leave for employees when approving Timesheets. You may have to do this when the shift was not worked as scheduled in the instance that the employee went home sick.
The new timesheet experience
Deputy is currently rolling out our improved Timesheet experience to all Deputy accounts. In this new experience, there are two ways for managers to add leave timesheets or convert timesheets to leave. If a manager approving timesheets knows that a team member did not work a scheduled shift, they have two options on the approving timesheets tab to add a leave for the team member:
- Create a new leave timesheet - a manager might use this option if there is otherwise no timesheet to convert to a leave timesheet, OR
- Convert a scheduled timesheet to leave - a manager might use this option to convert any ABSENT or LATE timesheet where the team member did not clock in for their scheduled shift and is instead entitled to leave.
Create a new leave timesheet (new Timesheets experience)
1. On the Approve Timesheets tab, click Add in the top right-hand corner and select Add leave to open the Request leave screen.
2. Type the name of the team member you would like to add a leave timesheet for and click to select their name from the drop-down menu. Click Continue.
3. You will be prompted to fill in the necessary details just like a leave request. This ensures that all relevant information, including leave balances and leave type, is accurately recorded.
A message will appear on the bottom left-hand side of the page to let you know that the leave request has been submitted and will appear in the timesheet list soon.
When the leave request has been added as a timesheet, you will be prompted to refresh the page and it will appear as already approved in the list.
Convert the schedule timesheet to leave (new Timesheets experience)
1. Locate the scheduled timesheet marked as 'Absent', 'Upcoming' or 'Late' that you wish to convert to leave
2. You can either click on the three horizontal dots and select Submit leave
OR you can click on the timesheet summary to see more detail and then click on Submit Leave.
Clicking this button will open the request leave flow but with the timesheet details pre-filled.
Review and confirm the leave details including the type of leave you wish to assign. Add a comment and click Request and approve.
A message will appear on the bottom left-hand side of the page to let you know that the leave request has been submitted and will appear in the timesheet list soon.
When the leave request has been added as a timesheet, you will be prompted to refresh the page and it will appear as already approved in the list.
The old timesheet experience
Convert the schedule timesheet to leave (old Timesheets experience)
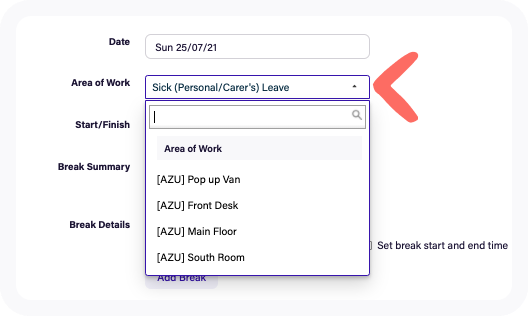
If you don't yet have access to the new Timesheet experience, you can create a new time sheet and manually add the required leave for the employee by selecting the leave type in Area of Work on the Timesheet.

