| Note: From October 1st, 2025, we introduced new plans that better reflect how our customers use Deputy: Lite, Core, and Pro. If you're an existing customer, look out for an email with all the details you’ll need. Learn more about the new plans and what this change means for you. |
Deputy integrates with Lightspeed Restaurant to facilitate labor forecasting by sending real-time data to Deputy and allowing you to accurately manage your staff based on busy and quiet periods.
This integration was built by Lightspeed, if you have any issues please contact LIghtspeed support.
This article will help managers connect Lightspeed Restaurant K series to their Deputy account:
- Authorizing the connection of Lightspeed to Deputy
- Select Deputy location
- Select sales type
- Area linking
- Employee linking
- Setting overview
Authorizing the connection of Lightspeed to Deputy
1. Log in to the Back Office with your Lightspeed Restaurant account credentials.
2. From the navigation menu, go to Integration > Employee scheduling.
3. Navigate to the Deputy integration and click More Details.
4. Click Enable Deputy to open the setup tab.
5. Fill in the appropriate information in each section.
6. Click Log in and Authorize to open a new browser tab.
7. Log in to Deputy with your Deputy credentials.
8. Click Log in.
9. Select your business.
10. Click Allow Access.
Select Deputy location
IMPORTANT: The selected Deputy location is final, and cannot be changed later. If a change is necessary, then you will need to disable and re-enable the integration.
1. From the drop-down menu, select the organization that Deputy will access information from.
2. Click Authorize.
3. Click Save and continue.
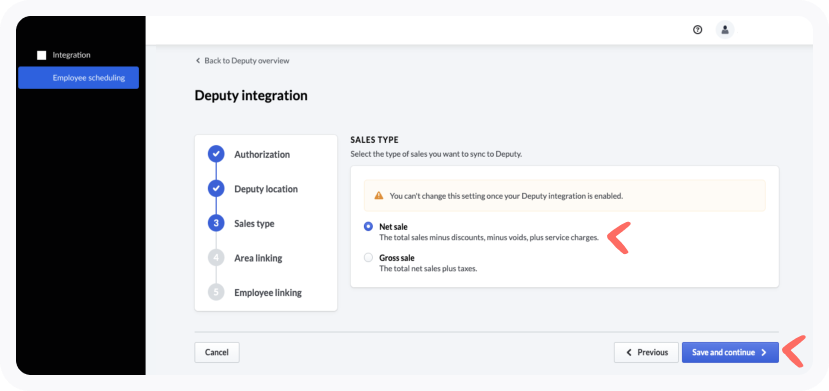
Select sales type
IMPORTANT: The selected sales type is final, and cannot be changed later. If a change is necessary, then you will need to disable and re-enable the integration.
1. Select the sales type as either Net sale or Gross sale, depending on how you want to push your sales data from Lightspeed Restaurant to Deputy.
2. Click Save and continue.

Area linking
1. Select which Deputy Area you want to push your sales data from Lightspeed Restaurant to Deputy.
2. In the Default Deputy Area, use the drop-down menu to select a default Deputy Area, which will automatically connect to all future unlinked POS configurations.
3. Click Save and continue.
Employee linking
1. Verify that your employees' names in Lightspeed POS match their names in Deputy. By default, the integration will try to auto-match names. If an employee’s name does not match, then it will appear highlighted in red at the top of the list.
2. Use the drop-down menu to select Don’t link to an employee, which will ensure not to link that specific Lightspeed POS user to any Deputy employee, or Add to Deputy employee, which will create a new Deputy employee corresponding to that Lightspeed POS user.
3. Click Save and continue.
Settings overview
1. Review your setup selections and make adjustments if needed.
2. Once finalized, click Save to enable the integration.
Once the integration is enabled, you will see a message confirming that the integration is enabled and the backfill job has been triggered. The backfill job is responsible for uploading your restaurant’s past 12 months of sales data into Deputy so that you can start seeing forecast trends. If for some reason, sales data is unable to be pushed through, then contact Lightspeed Support for assistance.
