| Note: From October 1st, 2025, we introduced new plans that better reflect how our customers use Deputy: Lite, Core, and Pro. If you're an existing customer, look out for an email with all the details you’ll need. Learn more about the new plans and what this change means for you. |
Connecting your Deputy account to Clover will allow you to sync data across both platforms, creating an efficient workplace ecosystem. Learn more about Sales data integrations.
Getting started
Please ensure that you:
- have access to a valid Clover account. To create an account, follow the steps provided at https://www.clover.com
- have Location Manager or System Administrator user access to your Deputy account
- are aware that when you activate the optional extension [Clover] Add User > [Deputy] Add Team member then all employees in your Clover account will automatically be synced to Deputy.
Connecting your Clover account to Deputy
Read Connecting New Integrations for an introduction to connecting to third-party systems.
1. Select Integrations from the drop-down menu under your name then click on Clover.
2. Click on Connect add-on and select the Deputy location in your account you wish to connect your Clover account to.
3. The first time (only) you connect you will need to enter your Clover API Token and Clover Merchant ID.
4. To retrieve this information you will first need to log in to your Clover account.
Scroll to the bottom of the menu on the left-hand side and click on Account & Set up.
5. Under the Business Operations section click API Tokens
6. Click Create New Token.
8. Copy the Token that has been created.
9. While still on the same Clover web page, review your URL in your browser address bar. Within the URL you will find your Clover Merchant ID. In the example URL below, the Clover Merchant ID is B062CV1
Activating the integration services
There are three optional integration services associated with Clover.
Click Activate to enable each one as required.
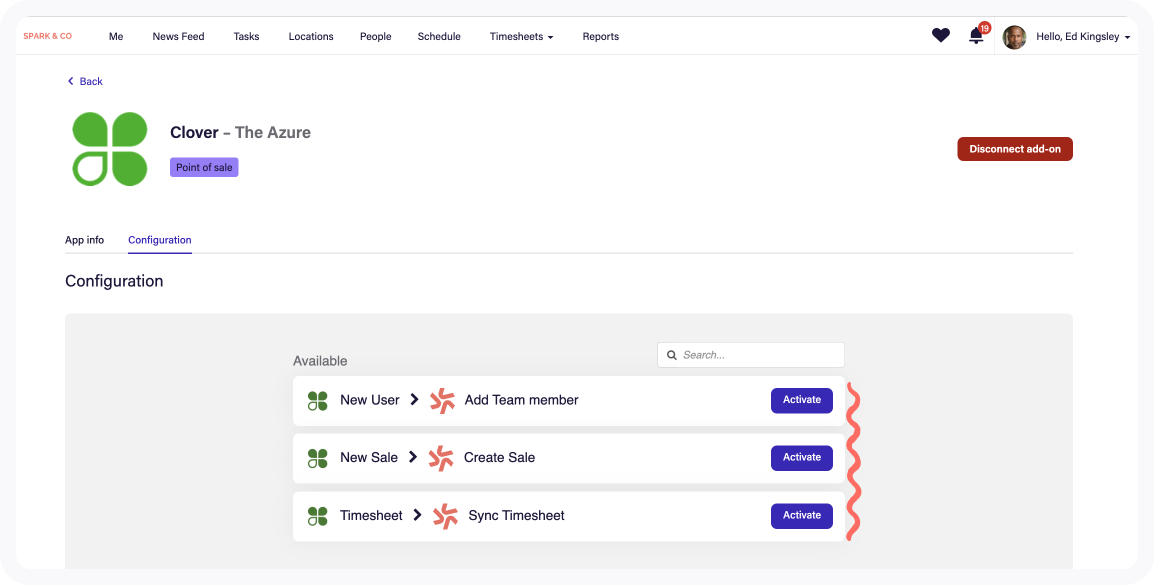 New User > Add Team member
If this service is activated then whenever a new user is created in Clover, it will automatically create the team member in Deputy and invite them to use Deputy.
IMPORTANT notes about activating this service:
- If you have already connected Deputy to your payroll provider and activated team member data sync from your payroll provider, it is not advised to activate the team member sync from your POS system to Deputy. This is because it could create conflicting information which will lead to issues when exporting the timesheet data from Deputy to your payroll provider later. If you do decide to activate the Team member sync between Clover and Deputy you MUST ensure that the employee details (e.g. first and last name) are the same across all three systems: Clover, Deputy, and payroll. If the details do not match, it can break the data flow and result in inaccurate or missing information about the team member's worked time and pay.
- When you first connect Clover to Deputy and activate the Add Team member integration service, it will pull all team members from your Clover account into Deputy. If they do not already exist in Deputy they receive an invite to join Deputy.
New Order > Create Sale
If this service is activated then when a sale or order is entered into Clover, this integration service will feed this data into Deputy in the Actual Sales category to populate the Stats panel on the Schedule tab. This will assist in effective scheduling in relation to employee cost vs sales. Read more about Deputy's Business Insights.
To configure this service:
1. Select the Clover Outlet you wish to sync sales data from.
2. Select the Deputy Area you wish to sync this sales data to choosing from:
- Match with Outlet name (Note: your Clover Outlet name would need to be identical to your Deputy areas to use this option)
- Allocate To Matched Employee's Current Working Area
- any of the Deputy Areas already set up in your Deputy Location that you have connected with Clover.
3. Click Save once you have made your selections.
You can activate and configure multiple services for this integration if you have multiple Clover Outlets to sync sales data across.
Timesheet > Sync Timesheet
If you activate this service then when a new timesheet is created within Clover, the system will replicate this in Deputy, allowing you to approve the timesheet in Deputy and export timesheets to your payroll.
To configure this service:
1. Select the Deputy Area you wish to timesheets to be created in Deputy when a new shift is created in Clover choosing from:
- Allocate to Matched Area Name (Note: your Clover Outlet name would need to be identical to your Deputy areas to use this option)
- Allocate To Matched Employee's Current Working Area
- any of the Deputy Areas already set up in your Deputy Location that you have connected with Clover.
3. Click Save once you have made your selections.